How Shakey’s Sponsored My Birthday After Almost Ruining It

It’s my birthday!

I woke up almost lunch time due to a get together the night before. It was raining so we decided to order in lunch from Shakey’s. Wifey ordered a lot because I heard her say “…change for PhP 1,500.00…”. I also heard the her give my number in addition to her number – maybe so that they can make sure that the order isn’t bogus since it’s a lot. So that’s done. We just needed to wait for the delivery to arrive.

I remember Mommy and Daddy bringing us to Shakey’s for some birthday celebrations when we we’re kids (can’t recall who’s birthday though). But I can clearly remember the Bunch-of-lunch with pizza, spaghetti, chicken and mojos and the super shakes! Even during and after high school, I’ve celebrated a birthday or two at Shakey’s.

Then things turned for the worse. The agent told us during the first call that if our order was not delivered within an hour, the order is going to be free of charge. After waiting for an hour and a half, wifey called the hotline to follow-up. To our surprise, the agent told her that the branch assigned to our area can no longer accommodate the delivery and since nobody followed-up before the hour was up, the order was not going to be delivered. Why do I need to follow-up before the hour is up? Why did they asked for two numbers if they are not going to contact us anyway? Wifey asked if that’s it and if there is nothing the agent can do with the current situation after making us wait for an hour and a half. The agent just kept on apologizing and saying that there is nothing they can do.

At this point, I took the phone from my wife and asked the agent to connect me to the manager of the branch assigned to our order. Daddy always said to talk to the manager regardless if it is a complain or a complement. The agent then placed me on hold for a few minutes and when she came back, she told me that the manager doesn’t want to talk and that there is really nothing that they can do. I insisted that I needed to talk to the manager and that I would go to their branch personally if the manager would not talk to me over the phone. You wouldn’t like me when I’m angry, much more when I’m hungry. Hell, I don’t even like myself when I’m angry. The agent placed me on hold once again but longer this time around. When she came back, she told me that all was taken cared of already. She gave me the order tracking number (03107191) which I was to present. We can get our food either by pick up or by dining in but the catch is, it’s on a different branch. And it’s all for free. Bleh! The concept of free food in exchange for the inconvenience doesn’t sit well with me. So anong pinaglalaban mo? Prinsipyo, teh. Prinsipyo!

We decided to agree with the arrangement since the branch was near the mall where we were going to later in the day. They didn’t say that we need to go to the branch right then and there so we did so only when it was convenient for us. They’ve inconvenienced us too much already.

When we got to the branch, I talked to the manager and told her what happened. I gave her the order tracking number and I also told her that I am a SuperCard holder and that today is my birthday. We were just attempting to celebrate and not be inconvenienced by all this miscommunication and irresponsibility. She went back to the counter and found our food all packed up and ready for take out. I could imagine the pizza being soggy, the chicken not being crispy, drinks stale due to the melted ice and the pasta no longer al dente with cold meatballs. Lo and behold, the manager ordered the crew to cook-up a new meal and in a few minutes, we were served with freshly cooked pizza, pasta and others – the way it should be served – hot and fresh out of the oven. The manager also gave us a pair of iced-tea and another pizza on the house.

At the end of our meal, I talked to the manager and she urged us to file a formal complaint via email (wecare(at)shakeys(dot)biz(dot)ph). It turns out that the agents in the hotline knows (or should know) which areas are no longer covered by which branch and that the order should not have been accepted in the first place. There have been instances similar to mine and that the branch would have to absorb the losses when it could have been avoided if the agent(s) in the hotline did their jobs properly.

Anyway, the order tracking number can be traced to the agent and a thorough review of historical transactions would certainly reveal a pattern – if there are any.

TL;DR

Called for food delivery. Delivery promo: If it’s late, it’s free. (1-hour grace period)
Waited for one and a half hour.
Talked to agent. Got apologies.
Wanted to talk to branch manager. Got turned down. Got more apologies.
Insisted to talk to branch manager. Threatened to physically go to the branch.
Informed that I need to go to a different branch. Bribed with free food. Got some more apologies.
Went to a different branch to pickup my food for delivery which I decided to just dine in.
Branch manager did what any decent manager would do.
Faith in Shakey’s restored.

Special thanks to Shakey’s Lagro branch for the hospitality and to Ms. Kate Tonogan, the Manager On Duty who did the right thing.

Gallery

Asus RT-AC88U Unboxing Photos

I’ve been looking for a WiFi router that has support for link-aggregation, dual WAN, dual-band (802.11ac), has good range, built-in network security and traffic analyzer, has USB 2.0 and 3.0 and has eight gigabit ports. Only a few routers are in the market that has all these features so it’s a quick decision to make which I did couple of months ago to replace my aging Linksys DD-WRT 54G. Below are the pictures I took during the unboxing. 🙂

The box of this router is big. And I mean really big! In all honesty, I wasn’t expecting it to be this huge.
20160915_163429.jpg

You can see in this photo how it sizes up compared to my Thinkpad x260. It’s much bigger and the laptop might even fit inside. 😮
20160925_142331.jpg

Once you remove the top part of the box, you’ll be greeted with the router in it’s plastic cover.
20160925_142551.jpg

After removing the router itself, you’ll be greeted with the Asus logo and it’s tag line. You’ll also see three of the four antenna peeking out.
20160925_142753.jpg

What I loved in this unboxing was the attention to detail made by the manufacturer. They have cutouts and thumb holes that helps in the removal of the packaging without damaging the other parts or ruining the unpacking experience for a peripheral that cost this much.
20160925_142708.jpg

Once the upper layer that held the router is removed, there is a small compartment underneath the Asus logo that holds two LAN cables, the AC adapter and cord options.
20160925_142848.jpg

Removing the four antenna reveals another compartment that holds a cord option, CD and user’s manual.
20160925_143351.jpg

Here are the contents for posterity. Notice the different cord options which is a nice addition since there wouldn’t be a need for a plug adaptor if the available wall socket is not compatible. It has different wall socket options from different regions like US, UK and ASIA.
20160925_143806.jpg

Here’s a close-up shot of the AC adapter.
20160925_144656.jpg

Lastly, here’s how it compares to the Thinkpad X260 when all the antennae are attached. Almost but not quite. 🙂
20160925_153441.jpg

Gut Feeling

It all started when Joey decided that she wants another litter.

She got busy with Benjie on 09/09/2016 despite our efforts to keep them apart. Unlike her first litter where we did not know when she got it on with Benjie, this time around we know the exact date. With that in mind, I went ahead and downloaded an app to determine when she would be whelping her second litter – yes there’s an app for that. The screenshot below is what I got:

screenshot_2016-11-05-19-07-45.jpgBred: 09/09/2016. Whelping: 11/11/2016

We wanted to be prepared when Joey whelps her second litter so we were closely monitoring her health, diet, temperature and temperament. I also committed to myself that I would create a whelping box similar to the first one where her pups would be kept safe for the first couple of months.

20161011_100014.jpgJoey on 10/11/2016. One month to go before the expected due date!

Right after All Soul’s Day (11/01/2016), I already had this nagging feeling that Joey is close to giving birth. I had to keep looking at the app and tell myself that I still have 10 days to go. I started to buy the materials for the whelping box on the morning of 11/05/2016 hoping that I would have enough time to finish. I guess Joey had other plans! She gave birth to her first pup for the second litter right after lunch. Exactly when I was in the middle of constructing her whelping box.

20161105_130451.jpgJoey and her first pup for the second litter!

It was a bit hard constructing her whelping box while also being kind of her nurse. Wifey and I would take turns watching over Joey as she gave birth to each of her nine puppies. We would then move the pups out of the way when she is resting or when she is having spasms when another puppy is about to come out. Although she gave birth to nine puppies, only seven survived. The other two were not breathing when they came out. We declared them unrecoverable only when Joey has already gotten too exhausted trying to revive them and only after we tried to do a CPR on the lung cavity. The final indicator that the pups were dead was when they let out a small amount of pee which signaled a loss of muscle control – much like in humans on their final seconds.

The whelping box I made measures 4ft. long by 3ft. wide which I think is enough for 7 puppies and Joey to fit in. Unlike the first whelping box, I made sure that the whole front is open and can be closed for safety reasons. I used a piano hinge to attach the front ramp to the whole box.

20161105_194513.jpgWhelping box with the ramp down.

20161105_194536.jpgWhelping box with the ramp up. Kinda reminds me of Bravestarr’s Fort Kerium in Fortress Mode 🙂

Although I was able to finish the box within the day, we decided not to move Joey and her litter from where she gave birth and just let her recover from exhaustion. We just prepared her box for their movement the following day. We added towels to keep them try and warm as well as some electric fan to keep them cool during days that are hot and humid.

20161105_194603.jpgAnother look of the whelping box from the different angle. 3/4″ marine board all around!

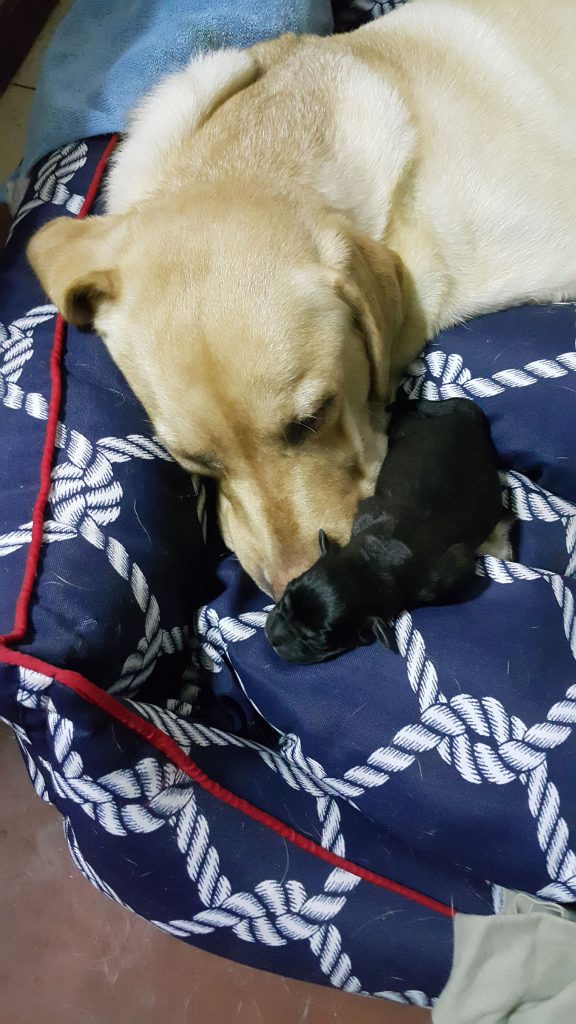
Here are some pictures of Joey resting after whelping her second litter while a curious pup snuggles with her.

20161106_111318-copy
20161106_105122-copy
20161106_111358-copy

When Services Don’t Work As They Should

Don’t you just hate it when you are paying for services that doesn’t work as they should?

Finally, after being a long-time subscriber, I went to a PLDT business center and asked them to cut my line. I told them to cut everything including the landline, mobile landline and DSL internet. They asked me why and I told them that the internet service is so slow (like less than 1Mbps slow) despite being subscribed to the 8Mbps plan. Then they proceed to ask me if I’ve reported the issue to their support hotline. F*CK! Of course I did! More than once! And nowhere near the advertised speed! For crying out loud, I am paying for almost 3,000PhP per month and I should be the one reporting if I am not getting the service that I am paying for?!

Moving on, I subscribed to Smart’s All-In 500 plan since the 4G-LTE speed in my area is way better than their sister company’s DSL offering (yes PLDT, I’m referring to you). I intend to use the postpaid line as my internet for the household.
smart

The idea is to get charged P5 per 15 minute from the plan’s consumable amount and let the Anti-Bill Shock (ABS) kick in to cap the charges. The ABS was 1,200PhP for as long as I can remember but this October, Smart changed it to 2,500PhP. As long as I am getting better (unthrottled) speeds and no volume caps, I can live with that. By my computation below and from my experience with PLDT, I’m still getting a better deal even with the new ABS.
minutes

The only problem with the ABS increase is that my credit limit is set to only 1,000PhP. This means that if my unbilled usage goes beyond that limit, the service is temporarily disconnected. Smart has a dashboard called mySmart where subscribers can request for an increase in credit limit. Below the form is a section for Important Reminders – fair enough.
creditlimit

So I went ahead and submitted a request for an increase in credit limit to 3,500PhP so that it is more than the ABS.
notification

Lo and behold, I got a response the following day via SMS:
mysmart
I was almost impressed with the response time – almost. Reading through the SMS, I would have to…

  1. Submit the same documents I submitted when I applied to become a postpaid subscriber – just a few months back.
  2. Submit those documents to http://www.smart.com.ph – when the form to request for a credit limit increase does not have any facility to do so!
  3. Go to Help & Support and narrate the concern – what the f*ck is the credit limit increase request form for?
  4. Fax. lol

In just an hour or so, I get another SMS:
notsmart

Can somebody please let them know that a quick response time means squat when it is out of context?
triple-facepalm

Gallery

Seagate Backup Plus Unboxing Photos

A few weeks ago, I bought a 4TB Seagate Backup Plus Portable online from one of the local sellers in Manila. This drive will serve as a storage for snapshot backups of my NAS (Network-Attached Storage) at home. Below are the pictures I took during the unboxing. 🙂

20161026_150646.jpg
The label on the box says 200GB of Cloud Storage for OneDrive is included but must be activated by June 20, 2017.

20161026_150657.jpg
The top of the box is has a tamper-evident seal that guarantees that the initial contents of the drive came straight form the manufacturer.

20161026_150711
The same tamper-evident seal can be found on the bottom of the box. This is how it would look like if the seal has been tampered with.

20161027_230459.jpg
The contents of the box are the Quick Start Guide and the drive itself inside a protective plastic shell which also contains the USB cable.

20161027_230519.jpg
Here’s the “top” of the protective plastic shell. Notice the six nubs that should somehow absorb and distribute the force should there be any impact from this side during transit. The protective shell is easy to open, much like Amazon’s frustration-free packages.

20161027_230638.jpg
The drive is wrapped in plastic inside the plastic shell together with the USB cable.

20161027_231009.jpg
The drive itself comes with a Micro-B SuperSpeed USB receptacle.

20161027_231039.jpg
The included cable is a Micro-B SuperSpeed on one end and a standard Type-A on the other end.

seagate
After plugging it in on my laptop, it was recognized immediately by Windows 10 without the need to install any drivers. The OS reports that the total drive space is 3.63TB and so far, this is more than enough of what I need for my NAS but as the saying goes, “you can never have too much backups.” 🙂

How To: Auto-mount A Network Share On Raspberry Pi On Boot

Find Out What’s Available

The first thing I did was to show all the mount points available on the server where the network share is:

$ showmount -e 192.168.1.4

The result should be something like this:

Export list for 192.168.1.4:
/Recordings
/Multimedia
/Download

Create Mount Folder in the Raspberry Pi

Then I created a folder in /mnt so that I can mount the network share on the folder:

$ sudo mkdir /mnt/multimedia_share

OPTIONAL: Mount Manually Before Attempting To Auto-mount

I manually played around with the mounting before actually trying to get it to auto-mount. A fun exercise for n00bs like me.

If the network share allows anonymous access, the following command should “map” the network share to the /mnt/multimedia_share

$ sudo mount -t cifs -o guest //192.168.1.4/Multimedia /mnt/multimedia_share

Otherwise, a mount error will be returned:

mount error(13): Permission denied
Refer to the mount.cifs(8) manual page (e.g. man mount.cifs)

If the network share requires credentials for access, the following command should be used:

$ sudo mount -t cifs -o username=user_name,password=plain_text_password //192.168.1.4/Multimedia /mnt/multimedia_share

To unmount, use the following command:

$ sudo umount //192.168.1.4/Multimedia

Configure Auto-mount on Boot

If we manually mount the network share, we will lose the “mapping” once the Raspberry Pi reboots. To have it mount upon boot, we have to edit the /etc/fstab file:

$ sudo nano /etc/fstab

Add the following line at the end of the file:

//192.168.1.4/Multimedia /mnt/multimedia_share cifs username=user_name,password=plain_text_password,file_mode=0777,dir_mode=0777 0 0

Save the file and run the following to have the network share mounted:

$ sudo mount -a

There wouldn’t be any feedback like a success message if there are no errors. So to see if the mount was successful, run the following:

$ df -h

That command should return something like this:

Filesystem --- Size --- Used --- Avail --- Use% --- Mounted on
/dev/root --- 15G --- 2.9G --- 11G --- 21% --- /
...
//192.168.1.4/Multimedia --- 5.4T --- 3.1T --- 2.4T --- 58% --- /mnt/multimedia_share

Note the last line where the details of the network share is displayed including the total size, used and available space.

To test if the auto-mount configuration worked, reboot the RPi:

$ sudo reboot

After it restarts, connect to the RPi and try to access the contents of the network share by going into:

$ cd /mnt/multimedia_share

How To: Generate SQL scripts from Liquibase changesets

There is a useful feature in Liquibase called Offline Database Support that allows you to generate the SQL scripts from the changesets without actually updating the database. This Offline Database Support functionality is called updateSql. This becomes handy when you cannot directly run Liquibase changesets on the target database or if the output of the changesets needs to be reviewed.

Note that updateSql checks the transactions within the DATABASECHANGELOG table to determine what SQL statements to generate. With that said, in the event that you cannot directly run the changesets against the target database, you can ask for the DATABASECHANGELOG table and use that to keep the history correct.

To streamline the process of generating SQL scripts, it would be useful to create a batch file that would contain the command and parameters. Let’s say that the filename is GenerateSQL.bat which currently contains the following values targeting an Oracle database:

C:\Dev\liquibase-3.3.2-bin\liquibase ^
--classpath="C:\Dev\liquibase-3.3.2-bin\lib\ojdbc7.jar" ^
--driver="oracle.jdbc.driver.OracleDriver" ^
--url=jdbc:"oracle:thin:@ORA-DBDEV:1521:DEVORA11G" ^
--username=DEV_LIQUIBASE_TEST ^
--password=asd123 ^
--changeLogFile="C:\Dev\LiquiBase\ORACLE\%1" ^
--logLevel=debug ^
--logFile="C:\Dev\LiquiBase\ORACLE\output.oracle.log" ^
updateSQL > C:\Dev\LiquiBase\ORACLE\output.oracle.%1.sql

where…
Line 01: Location of Liquibase binary
Line 02: Location of JDBC driver. Valid values are:

  • ojdbc7.jar (ORACLE)
  • sqljdbc41.jar (MSSQL)

Line 03: Name of the JDBC driver. Valid values are:

  • oracle.jdbc.driver.OracleDriver (ORACLE)
  • com.microsoft.sqlserver.jdbc.SQLServerDriver (MSSQL)

Line 04: Details of the database server. Valid values are:

  • jdbc:”oracle:thin:@<SERVER_NAME>:<PORT>:<SERVICE_ID>” (ORACLE)
    • jdbc:”oracle:thin:@SERVER01:1521:DEVORA11G”
  • jdbc:”sqlserver://<SERVER_NAME><SERVER_INSTANCE>;databaseName=<DB_NAME>” (MSSQL)
    • jdbc:”sqlserver://SERVER01SQL2014;databaseName=DEVSQL”

Line 05: Database server username
Line 06: Database server password
Line 07: Location of the Liquibase change set file (*.xml)
Line 09: The log file for the operation
Line 10: The file where the generated SQL scripts will be stored.

Lines 07 and 10 have “%1” which represents an argument passed during execution of the batch file. This batch file can be used as follows:

C:\Dev\Liquibase\GenerateSQL.bat ChangeSetFileName.xml

This command will create output.oracle.log and output.oracle.ChangeSetFileName.xml.sql

You can integrate this process in Visual Studio by following this article. Note that you need to change the contents of the batch file to use updateSql.

How To: Install Liquibase On Your Local Machine

STEP 1

Download all pre-requisites and dependencies:

* – Download sqljdbc_4.1.5605.100_enu.tar.gz then extract sqljdbc41.jar
** – Download ojdbc7.jar

STEP 2

  • Install Java JDK
  • Extract Liquibase to a folder on your local machine (e.g. c:devliquibase-3.3.3-bin)
  • Copy sqljdbc41.jar and ojdbc7.jar to the lib folder of Liquibase (e.g. c:devliquibase-3.3.3-binlib)
  • Modify the liquibase shell file located on the root folder (e.g. c:devliquibase-3.3.3-binliquibase.bat) by adding “-Xmx1024m” after JAVA_OPTS=
IF NOT DEFINED JAVA_OPTS set JAVA_OPTS="-Xmx1024m"

java -cp "%CP%" %JAVA_OPTS% liquibase.integration.commandline.Main %CMD_LINE_ARGS%

OPTIONAL:

  • Add Liquibase to your PATH environment variable by:
  • Right-clicking Computer > Properties > Advanced System Settings > Advanced tab
  • Click Environment Variables button
  • Edit PATH variable and put in the Liquibase folder (e.g. c:\dev\liquibase-3.3.3-bin)

Congratulations! You are now a proud owner of a computer with Liquibase.

How To: Execute Liquibase Database Change Log file (a.k.a. "driver file") from Visual Studio

The Liquibase Database Change Log file or as we refer to it, the “driver” file, is the root of all changesets. This is the file that is passed to Liquibase during execution as the changeLogFile parameter which lists all changesets that needs to be executed in order. And because we love Visual Studio, we’d like to execute the driver file right from the IDE.

First step is to create a batch file with the following contents. Place this file in a folder that you can easily remember (c:\Dev\Liquibase\LBUpdateSQL.bat):

C:\Dev\liquibase-3.3.3-bin\liquibase ^
--classpath="C:\Dev\liquibase-3.3.3-bin\lib\sqljdbc41.jar" ^
--driver="com.microsoft.sqlserver.jdbc.SQLServerDriver" ^
--url=jdbc:"sqlserver://127.0.0.1;databaseName=TARGET_DB" ^
--defaultSchemaName=dbo ^
--username=******** ^
--password=******** ^
--changeLogFile=%1 ^
--logLevel=info ^
--logFile="C:\Dev\LiquiBase\logs\output.log" ^
update

Don’t forget to change the values for TARGET_DB, username and password. Also make sure that the paths are valid and appropriate (lines 1, 2 and 10).

Next step is to open Visual Studio and click on TOOLS > External Tools… and click the Add button. Fill-out all the fields as in below and make sure Close on exit is not checked:

liquibase-external-tool

Now this part is important. Make sure that the Initial directory points to the location of the driver file (in this case its C:\Dev\git-repos\DatabaseScripts\(project_name)\updates). This will ensure that the filename field in the DATABASECHANGELOG table only contains the filename of the changeset and not the full path. To understand why this is important, read more here.

Click on Ok to close the External Tools window.

Lastly,open the driver file in Visual Studio and click on TOOLS > Liquibase (this is what you placed in the Title field in the screenshot above).

run-driver-run

There should be a command window that pops up that shows if the execution has failed or succeeded. The equivalent of all of this is like executing the batch file via command window while on the folder that contains the driver file with the driver file as an argument.

How Liquibase Considers A Changeset As Unique

We have a sandbox here in the office that has a database that we run the Liquibase Database Change Log file (a.k.a. “driver file”) against every now and then. We do not develop against this database since one of its purpose is to ensure that the latest version of the driver file runs without problems.

A few days ago, I took a backup of that database and restored it to my local machine. According to the DATABASECHANGELOG table, the driver file was last ran on 17 JUN (see screenshot below). However, when I tried running the latest Liquibase driver file from /develop against my now local db, I got a variety of errors ranging from duplicate key values to tables/columns already existing.

databasechangelog-table

I might have missed the email but last time I checked, the idea was to allow running and re-running of the changesets without having a negative effect and without having the execution error out. I had to exclude a bunch of changeset entries in the driver file to get it to finish without reporting any errors. Below is the list with the reason why it failed:

liquibase-problem-files

An officemate tried to run the latest driver file on his local machine and worked without any problems. We checked the DATABASECHANGELOG table for the existence of the IDs of the changesets and to our surprise, they were already there. The errors being thrown due to the lack of precondition in the changesets are just a manifestation of a different problem altogether (although the lack of precondition on the changeset is a problem on its own). We were able to come to that conclusion because Liquibase will only try and run the changeset if that changeset’s ID is not on the DATABASECHANGELOG table. So why is Liquibase trying to execute a changeset when the ID of the changeset is already in the DATABASECHANGELOG table?

Upon further investigation, we came upon this question on StackOverflow: Liquibase tried to apply all changeset, even if database is present‌
The take away is that Liquibase tracks each changeset as a row in the DATABASECHANGELOG table which is composed of the combination of the “id”, “author” and a “filename” column.

If we go back to the first screenshot above, you’ll notice that the value for the FILENAME column after 17 JUN 2015 has changed. At this point, it means that I’ve restored a backup of that database to my local machine and the path where I’ve been executing Liquibase is different from the path where Liquibase was being executed on the sandbox in the office.

So how did we solve the problem?

1.) We cleaned up the filename column so that it only contains the actual filename of the changeset.*

2.) Made modifications on the way we were executing the driver file moving forward so that the FILENAME column only contains that – the filename without paths. (How To: Execute Liquibase Database Change Log file (a.k.a. “driver file”) from Visual Studio).

fixed-filename-only

.* truncated the DATABASECHANGELOG table, dropped all affected tables and ran the driver file.